Show Director supports DMX devices in two ways. First by providing a simple way to address a DMX controller, channel and value for that channel. The second is by providing specific devices where multiple channels are used. Below we will provide example of how each can be used.
Show Director allows for DMX devices to be added to any show script. Different actions can be specified using the existing columns in your script. One requirement for the DMX devices is that the TYPE column in your script must be exactly one of the supported DMX types. For example, the SimpleDMX type must be specified in the TYPE column as "SimpleDMX". Case and spelling do count. Other columns will contain the additional information based on the DMX command.
The most basic of the DMX commands is a generic simple command. This will set one of the 512 channels to a specified value. We allow for CUSTOM1 column to be used to over-ride the PIN column. This is so that you can create Effects Manager entries to control the intensity value set to the PIN column. If you put a numerical value in CUSTOM1, it will over-ride the value in PIN. Otherwise, use the PIN column.
SD Column Name |
DMX |
Note |
TYPE |
Must be "SimpleDMX" |
|
CONTROL |
Controller |
One DMX controller universe per serial USB connection |
MODULE |
Channel |
Values 1 to 512 are allowed |
DUR |
The duration that this channel will have this value before returning to zero |
If duration is zero (00:00) then the channel is set to value permanently, otherwise max duration is 99 seconds |
PIN or CUSTOM1 |
Value to place on the Channel |
Values 0 to 255 are allowed. |
Here is an example of what a SD script might look like using SimpleDMX commands:
CUE |
HH MM SS FF |
TYPE |
CONTROL |
MODULE |
DUR |
PIN |
Event Description |
1 |
00 00 00 00 |
SimpleDMX |
C1 |
12 |
01:15 |
255 |
Turn channel 12 on for 1 and a half sec |
2 |
00 00 05 00 |
SimpleDMX |
C1 |
7 |
00:00 |
127 |
Set channel 7 to 127 |
3 |
00 00 10 15 |
SimpleDMX |
C1 |
7 |
00:00 |
0 |
Set channel 7 to 0 |
When the DUR column is zero, then the value place on the channel is permanent until changed again by another cue. However, if a duration is provided, then the channel is set to the value in the PIN column for the specified time and then the channel is returned to zero. The limit on duration is 99 seconds.
One of the specifically supported DMX devices is the G-Flame by Galaxis. Like most flame boxes, the G-Flame has a safety channel as well as a trigger channel. In order for the G-Flame to operate, the safety channel must first be turned on and later, for safety, must be turned off. The G-Flame therefore has three command: GFlameSafetyOn, GFlameTrigger and GFlameSafetyOff. These can be called multiple times during the show as long as the safety channel is on before any event triggers. Note that multiple G-Flame devices can share a single safety channel. Here are the SD columns and an example script:
SD Column Name |
DMX |
Note |
TYPE |
One of the GFlame commands listed below |
|
CONTROL |
Controller |
One DMX controller universe per serial USB connection |
MODULE |
Channel |
Values 1 to 512 are allowed |
DUR |
The duration of this flame |
Must be a value between 00:01 and 25:00 (maximum duration) |
Assuming two G-Flame boxes are configured with safety channel 33 and trigger channel 2 and 17 respectively:
CUE |
HH MM SS FF |
TYPE |
CONTROL |
MODULE |
DUR |
Event Description |
1 |
00 00 00 00 |
GFlameSafetyOn |
G2 |
33 |
00:00 |
Set channel 33 to GFlame safety value |
2 |
00 00 05 00 |
GFlameTrigger |
G2 |
2 |
00:15 |
Flame on device 2 for half sec |
3 |
00 00 05 00 |
GFlameTrigger |
G2 |
17 |
00:15 |
Also start device 17 for same |
4 |
00 01 00 00 |
GFlameTrigger |
G2 |
2 |
05:00 |
Flame on device 2 for 5 sec |
5 |
00 05 00 00 |
GFlameSafetyOff |
G2 |
33 |
00:00 |
Disable both 2 and 17 |
You should always turn the G-Flame safety on for at least 1 second before any trigger events in order to give the flame box time to get activated.
The Salamander Flame Box is a specifically supported DMX device. Like all flame boxes it has a safety channel and a trigger channel. In order for the flame box to operate, the safety channel must be turned on before any trigger commands will activate. For safety reasons we must also turn the safety channel back off at the end of the script. The safety and triggers may be turned on or off any number of times as long as the safety is on before any trigger cues are executed. The Salamander has three commands for this: SalamanderSafetyOn, SalamanderTrigger and SalamanderSafetyOff. Note that multiple Salamander devices may use the same safety channel.
SD Column Name |
DMX |
Note |
TYPE |
One of the Salamander commands listed below |
|
CONTROL |
Controller |
One DMX controller universe per serial USB connection |
MODULE |
Channel |
Values 1 to 512 are allowed |
DUR |
The duration of this flame |
Must be a value between 00:01 and 25:00 (maximum duration) |
Here is an example SD script using two Salamander flame boxes with separate safety channels. One has the safety channel on 1 and trigger on 2, the other safety is 3 and trigger 4.
CUE |
HH MM SS FF |
TYPE |
CONTROL |
MODULE |
DUR |
Event Description |
1 |
00 00 00 00 |
SalamanderSafetyOn |
C1 |
1 |
00:00 |
Set channel 1 to Salamander safety value for device 2 |
2 |
00 00 00 00 |
SalamanderSafetyOn |
C1 |
3 |
00:00 |
Set channel 3 to Salamander safety value for device 4 |
3 |
00 00 10 00 |
SalamanderTrigger |
C1 |
2 |
00:15 |
Flame on device 2 for half sec |
4 |
00 00 10 00 |
SalamanderTrigger |
C1 |
4 |
00:15 |
Also start device 4 for same |
5 |
00 01 00 00 |
SalamanderTrigger |
C1 |
2 |
05:00 |
Flame on device 2 for 5 sec |
6 |
00 05 00 00 |
SalamanderSafetyOff |
C1 |
1 |
00:00 |
Disable channel 1 for 2 |
7 |
00 05 00 00 |
SalamanderSafetyOff |
C1 |
3 |
00:00 |
Disable channel 3 for 4 |
You should always allow for 10 seconds after turning the Salamander safety channel on before any trigger events.
The Explo X2 Wave flame box is specifically supported by SD. This DMX device sports a moving flame head and is a little more complex the some other flame boxes. SD takes care of this complexity through four commands: X2WaveSafetyOn, X2WaveTrigger, X2WaveSeq and S2WaveSafetyOff. The X2 Wave device has a safety channel for each device and they cannot be shared. A unique feature of the X2 Wave is that you only need to set the first channel of the device. All other features are an offset from that first channel and therefore not required to be specified in the SD script. There are 6 channels in use, so the base addresses for any other device must be 6 greater than the base address of the X2 Wave. If the base channel of a X2 Wave flame box is 6, then the next DMX device on the controller must be set to 12 or higher otherwise you will have channel conflicts and errors.
SD Column Name |
DMX |
Note |
TYPE |
One of the GFlame commands listed below |
|
CONTROL |
Controller |
One DMX controller universe per serial USB connection |
MODULE |
Channel |
Values 1 to 512 are allowed |
DUR |
The duration of this flame |
Must be a value between 00:01 and 02:15 (maximum duration) |
TILT |
Angle of the flame head |
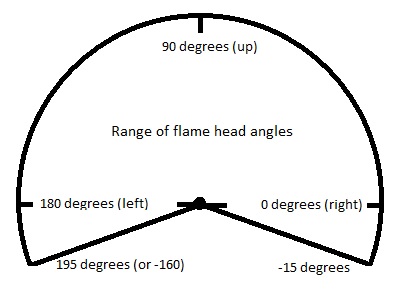
0 degrees is horizontal right, 90 is up and 180 is horizontal left. Negative values may be used between 0 and -180 to represent down (-90 is down).
|
CUSTOM2 |
Speed of flame head |
When the flame head changes positions, the speed at which if moves may be specified. 0 is stationary, 1 (slowest) to 255 (fastest). Default movement is fastest. |
REF |
Built-in X2 Wave sequences |
There are 70 built in sequences programmed into the X2 Wave. See the X2 Wave user's manual for a full explanation of these sequences. |
Here is an example SD script using the X2 Wave. Assume we have two devices set to base channel 10 and 16 respectively.
CUE |
HH MM SS FF |
TYPE |
CONTROL |
MODULE |
DUR |
REF |
TILT |
CUSTOM2 |
Event Description |
1 |
00 00 00 00 |
X2WaveSafetyOn |
DD1 |
10 |
00:00 |
Set safety on for device 10 |
|||
2 |
00 00 00 00 |
X2WaveSafetyOn |
DD1 |
16 |
00:00 |
Set safety on for device 16 |
|||
3 |
00 00 10 00 |
X2WaveTrigger |
DD1 |
10 |
00:15 |
Flame on device 10 for half sec |
|||
4 |
00 00 10 00 |
X2WaveTrigger |
DD1 |
16 |
00:15 |
Also start device 16 for same |
|||
5 |
00 01 00 00 |
X2WaveTrigger |
DD1 |
10 |
02:00 |
Flame on device 10 for 2 sec |
|||
6 |
00 01 30 00 |
X2WaveTrigger |
DD1 |
10 |
00:00 |
135 |
255 |
Flame off, move head to 45 left |
|
7 |
00 01 00 00 |
X2WaveTrigger |
DD1 |
10 |
02:15 |
45 |
127 |
Flame on med wave to 45 right |
|
8 |
00 01 00 00 |
X2WaveTrigger |
DD1 |
10 |
00:00 |
90 |
255 |
Flame off move to up |
|
9 |
00 01 00 00 |
X2WaveTrigger |
DD1 |
10 |
02:00 |
Flame on device 10 for 2 sec |
|||
10 |
00 01 00 00 |
X2WaveSeq |
DD1 |
10 |
00:00 |
51 |
Seq med wave 45 left to 45 right |
||
11 |
00 01 00 00 |
X2WaveSeq |
DD1 |
16 |
00:00 |
52 |
Seq med wave 45 right to 45 left |
||
12 |
00 05 00 00 |
X2WaveSafetyOn |
DD1 |
10 |
00:00 |
Disable device 10 |
|||
13 |
00 05 00 00 |
X2WaveSafetyOn |
DD1 |
16 |
00:00 |
Disable device 16 |
The build in sequences in the X2 Wave are nice in that cue 10 does the same thing as cues 6,7 and the duration of the flame is regulated by the sequence, not by the script writers estimation.
The SafeX Flame Jet flame box is another SD supported DMX device. Like all flame boxes it has a safety channel and a trigger channel. In order for the flame box to operate, the safety channel must be turned on before any trigger commands will activate. For safety reasons we must also turn the safety channel back off at the end of the script. The safety and triggers may be turned on or off any number of times as long as the safety is on before any trigger cues are executed. The Flame Jet has three commands for this: FlameJetSafetyOn, FlameJetTrigger and FlameJetSafetyOff. Note that multiple Flame Jet devices may use the same safety channel.
SD Column Name |
DMX |
Note |
TYPE |
One of the Flame Jet commands listed below |
|
CONTROL |
Controller |
One DMX controller universe per serial USB connection |
MODULE |
Channel |
Values 1 to 512 are allowed |
DUR |
The duration of this flame |
Must be a value between 00:01 and 10:00 (maximum duration) |
Assuming two Flame Jet boxes are configured with safety channel 33 and trigger channel 2 and 17 respectively:
CUE |
HH MM SS FF |
TYPE |
CONTROL |
MODULE |
DUR |
Event Description |
1 |
00 00 00 00 |
FlameJetSafetyOn |
G2 |
33 |
00:00 |
Set channel 33 to FlameJet safety |
2 |
00 00 05 00 |
FlameJetTrigger |
G2 |
2 |
00:15 |
Flame on device 2 for half sec |
3 |
00 00 05 00 |
FlameJetTrigger |
G2 |
17 |
00:15 |
Also start device 17 for same |
4 |
00 01 00 00 |
FlameJetTrigger |
G2 |
2 |
05:00 |
Flame on device 2 for 5 sec |
5 |
00 05 00 00 |
FlameJetSafetyOff |
G2 |
33 |
00:00 |
Disable both 2 and 17 |
You should always turn the Flame Jet safety on for at least 1 second before any trigger events in order to give the flame box time to get activated.
A very common DMX controlled light is one with four channels that does Red, Green and Blue colors. Show Director Control has provided a TYPE for this light. The Control for the light is in the PIN (or CUSTOM1) column and is light specific as to how values control the light. Typically 0 turns the light off and 255 will use the values of Red, Green and Blue to set color and intensity. Your lamp may have other features that are controlled using the PIN column. Consult your manual. To specify a color, you need to have the start of the Effect Description have a '#RRGGBB' hexadecimal value. These values are two hex characters each for red, green and blue. So, for example, #FF0000 would be full red. #00FF00 would be full Blue, etc. #7F0000 would be half intensity red. #00FFFF would be bright cyan. If you provide a duration, the light will turn on for than amount of time and then turn itself off.
SD Column Name |
DMX |
Note |
TYPE |
Must be "CRGBLight" |
|
CONTROL |
Controller |
One DMX controller universe per serial USB connection |
MODULE |
Channel |
Values 1 to 512 are allowed. Each CRGBLight uses 4 contiguous channels. Next device must be 4 higher than the value used here. |
DUR |
The duration that this channel will have this value before returning to zero |
If duration is zero (00:00) then the channel is set to value permanently, otherwise max duration is 99 seconds |
PIN or CUSTOM1 |
Control value to place on the Channel |
Values 0 to 255 are allowed. Typically 0 is off and 255 uses the color and intensity provided. Other values are light specific features like blinking and fade. |
Effect Description |
Color and Intensity of the light |
Values #000000 to #FFFFFF are allowed |
Here is an example of what a SD script might look like using CRGBLight commands:
CUE |
HH MM SS FF |
TYPE |
CONTROL |
MODULE |
DUR |
PIN |
Event Description |
1 |
00 00 00 00 |
CRGBLight |
C1 |
1 |
01:15 |
255 |
#FFFFFF bright white for 1.5 seconds |
2 |
00 00 05 00 |
CRGBLight |
C1 |
1 |
00:00 |
255 |
#FF0000 full red on |
3 |
00 00 10 15 |
CRGBLight |
C1 |
1 |
00:00 |
255 |
#A5184C switch to custom color |
4 |
00 00 12 15 |
CRGBLight |
C1 |
1 |
00:00 |
0 |
Turn light off |
Another common DMX controlled light is one with 10 channels that does Pan, Tilt, colors. Show Director Control has provided a TYPE for this light. In this light, the color is determined by an internal color wheel that has 7 colors: White, Red, Green, Blue, Cyan, Yellow and Magenta. To specify a color, you need to have the start of the Effect Description have a '#RRGGBB' hexadecimal value. These values are two hex characters each for red, green and blue. So, for example, #FF0000 would be full red. #00FF00 would be full Blue, #00FFFF would be bright cyan, etc. If you provide a duration, the light will turn on for than amount of time and then turn itself off. In addition the light has a swivel head and can be panned or tilted. You can pan through 360 degrees and tilt from 0 to 180. The light can be pan/tilted while the light is off or on.
SD Column Name |
DMX |
Note |
TYPE |
Must be "PanTiltWRGBCYMLight" |
|
CONTROL |
Controller |
One DMX controller universe per serial USB connection |
MODULE |
Channel |
Values 1 to 512 are allowed. Each PanTiltWRGBCYMLight uses 8 contiguous channels. Next device must be 8 higher than the value used here. |
DUR |
The duration that this channel will have this value before returning to zero |
If duration is zero (00:00) then the channel is set to value permanently, otherwise max duration is 99 seconds |
PIN or CUSTOM1 |
The intensity of the light |
Values 0 to 255 are allowed. 0 is off through 255 being full intensity. |
Effect Description |
Color of the light |
Values #000000 to #FFFFFF are allowed. |
PAN |
Pan angle of the light |
Values 0-360. |
TILT |
Tilt angle of the light |
Values 0-180. |
CUSTOM2 |
Speed of the pan and tilt |
Values 1-255. 1 is slow, 255 is fast. Zero or blank is fast. |
Here is an example of what a SD script might look like using PanTiltWRGBCYMLight commands:
CUE |
HH MM SS FF |
TYPE |
CONTROL |
MOD |
DUR |
PIN |
PAN |
TILT |
CUSTOM2 |
Event Description |
1 |
00 00 00 00 |
PanTiltWRGBCYMLight |
C1 |
7 |
01:15 |
255 |
#FFFFFF bright white for 1.5 seconds |
|||
2 |
00 00 05 00 |
PanTiltWRGBCYMLight |
C1 |
7 |
00:00 |
255 |
90 |
45 |
127 |
#FF0000 full red on, pan 90 and tilt up 45, medium speed |
3 |
00 00 10 15 |
PanTiltWRGBCYMLight |
C1 |
7 |
00:00 |
255 |
135 |
255 |
#A5184C switch to custom color and tilt over to 135, fast speed |
|
3 |
00 00 12 15 |
PanTiltWRGBCYMLight |
C1 |
7 |
00:00 |
0 |
0 |
0 |
Turn light off and return to center pan and tilt, fast speed |
Created with the Personal Edition of HelpNDoc: Single source CHM, PDF, DOC and HTML Help creation